失败的定义:什么都要做,什么都在做,却从未做完过,也未做好过。
生活或者工作中,可能会有那么一部分人是优秀的,他们各自在自己的领域可能做出了一定的成就,这时可能会让你感觉到迷惘,可能觉得别人的工作是那么的容易成功,然后就都想去尝试,来来回回,可能就是什么都想做,然后却什么都没做好,举个大学的例子,大学环境是那么的友好,社团和活动众多,但到头来,可能很多大学生感觉被大学给上了,留下的只有大学的玩乐,能力无所增长。或者身边需要优秀的人带领,但是有时候身边怎么可能总是有那么优秀的人会伴随着你,指引着你,所以这时就需要审思自我,不要被太多东西所迷惑,坚持几件事情,哪怕一件事情,大学四年你也会得到你想要的结果。所以找到自己喜欢的事情,就花时间坚持做下去,尽可能做好,做正确,当然不反对,选择有时候比坚持更重要,但是没有坚持,选择只是一个空壳,生活或者工作中,你可以去争取更多的选择机会,但是请对你的选择的东西坚持下去,我相信任何的努力都不是白费。
CodePush
react-native-code-push,一个微软开源的react-native的开源插件,CodePush是一个微软开发的云服务器。通过它,开发者可以直接在用户的设备上部署手机应用更新。CodePush相当于一个中心仓库,开发者可以推送当前的更新(包括JS/HTML/CSS/IMAGE等)到CoduPush,APP检查到有更新,就可以及时更新应用。
流程
整体流程如下
- 安装 CodePush CLI。
- 注册 CodePush账号
- 在CodePush服务器注册App
- RN代码中集成CodePush
- 更新代码后,发布一个应用更新到服务器
- app收到升级后更新
1.安装CodePush CLI
npm install -g code-push-cli
安装完后,输入一下命令
code-push -v
如果出现版本号,则表示安装成功,还可以通过输入以下命令查看相关的command指令
code-push -h
2.注册 CodePush账号
code-push register
执行完后会自动出现一个授权网页,让你选择哪种方式登录,一般选择github登录即可。当注册成功后,CodePush会给我们一个key,将此key复制后,粘贴到控制台即可。
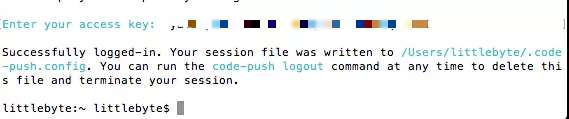
code-push login
[Error] You are alreay logged in from this machine.
出现这个表示你已经注册成功,且你的电脑已经登录完成。
3.在CodePush服务器注册App
为了让CodePush服务器有我们的App,我们需要CodePush注册App,输入下面命令即可完成注册,这里需要注意如果我们的应用分为iOS和Android两个平台,这时我们需要分别注册两套key 应用添加成功后就会返回对应的production 和 Staging 两个key,production代表生产版的热更新部署,Staging代表开发版的热更新部署,在ios中将staging的部署key复制在info.plist的CodePushDeploymentKey值中,在android中复制在Application的getPackages的CodePush中
iOS平台应用
code-push app add <appName> ios react-native
Android平台应用
code-push app add <appName> Android react-native
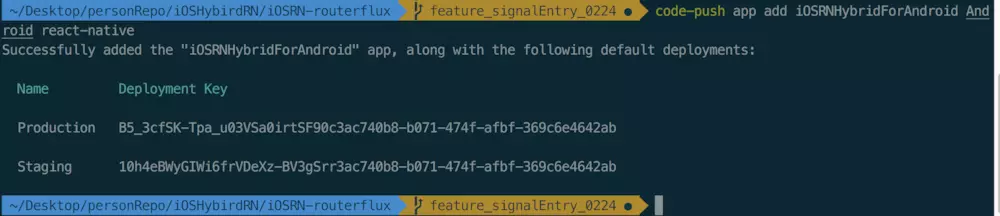
可以通过如下命令查看production 和 Staging 两个key
code-push app list
CodePush管理App的相关命令:
- code-push app add 在账号里面添加一个新的app
- code-push app remove 或者 rm 在账号里移除一个app
- code-push app rename 重命名一个存在app
- code-push app list 或则 ls 列出账号下面的所有app
- code-push app transfer 把app的所有权转移到另外一个账号
4.RN代码中集成CodePush
首先我们需要安装CodeoPush组件,然后通过link命令添加原生依赖,最后在RN根组件中添加热更新逻辑代码
npm install react-native-code-push --save
react-native link react-native-code-push
在你的react-native项目中,将app.js文件写成如下,以下只是Demo案例。
import React, { Component } from 'react';
import {
  AppRegistry,
  Dimensions,
  Image,
  StyleSheet,
  Text,
  TouchableOpacity,
  View,
} from 'react-native';

import CodePush from "react-native-code-push";

class App extends Component {
  constructor() {
    super();
    this.state = { restartAllowed: true };
  }

  codePushStatusDidChange(syncStatus) {
    switch(syncStatus) {
      case CodePush.SyncStatus.CHECKING_FOR_UPDATE:
        this.setState({ syncMessage: "Checking for update." });
        break;
      case CodePush.SyncStatus.DOWNLOADING_PACKAGE:
        this.setState({ syncMessage: "Downloading package." });
        break;
      case CodePush.SyncStatus.AWAITING_USER_ACTION:
        this.setState({ syncMessage: "Awaiting user action." });
        break;
      case CodePush.SyncStatus.INSTALLING_UPDATE:
        this.setState({ syncMessage: "Installing update." });
        break;
      case CodePush.SyncStatus.UP_TO_DATE:
        this.setState({ syncMessage: "App up to date.", progress: false });
        break;
      case CodePush.SyncStatus.UPDATE_IGNORED:
        this.setState({ syncMessage: "Update cancelled by user.", progress: false });
        break;
      case CodePush.SyncStatus.UPDATE_INSTALLED:
        this.setState({ syncMessage: "Update installed and will be applied on restart.", progress: false });
        break;
      case CodePush.SyncStatus.UNKNOWN_ERROR:
        this.setState({ syncMessage: "An unknown error occurred.", progress: false });
        break;
    }
  }

  codePushDownloadDidProgress(progress) {
    this.setState({ progress });
  }

  toggleAllowRestart() {
    this.state.restartAllowed
      ? CodePush.disallowRestart()
      : CodePush.allowRestart();

    this.setState({ restartAllowed: !this.state.restartAllowed });
  }

  getUpdateMetadata() {
    CodePush.getUpdateMetadata(CodePush.UpdateState.RUNNING)
      .then((metadata: LocalPackage) => {
        this.setState({ syncMessage: metadata ? JSON.stringify(metadata) : "Running binary version", progress: false });
      }, (error: any) => {
        this.setState({ syncMessage: "Error: " + error, progress: false });
      });
  }

  /** Update is downloaded silently, and applied on restart (recommended) */
  sync() {
    CodePush.sync(
      {},
      this.codePushStatusDidChange.bind(this),
      this.codePushDownloadDidProgress.bind(this)
    );
  }

  /** Update pops a confirmation dialog, and then immediately reboots the app */
  syncImmediate() {
    CodePush.sync(
        {
          //安装模式
          //ON_NEXT_RESUME 下次恢复到前台时
          //ON_NEXT_RESTART 下一次重启时
          //IMMEDIATE 马上更新
          installMode: CodePush.InstallMode.IMMEDIATE,
          //或者mandatoryInstallMode:codePush.InstallMode.IMMEDIATE,
          //production key
          deploymentKey: CODE_PUSH_PRODUCTION_KEY,
          updateDialog: true
        },
      this.codePushStatusDidChange.bind(this),
      this.codePushDownloadDidProgress.bind(this)
    );
  }

  render() {
    let progressView;

    if (this.state.progress) {
      progressView = (
        <Text style={styles.messages}>{this.state.progress.receivedBytes} of {this.state.progress.totalBytes} bytes received</Text>
      );
    }

    return (
      <View style={styles.container}>
        <Text style={styles.welcome}>
          Welcome to CodePush!
        </Text>
        <TouchableOpacity onPress={this.sync.bind(this)}>
          <Text style={styles.syncButton}>Press for background sync</Text>
        </TouchableOpacity>
        <TouchableOpacity onPress={this.syncImmediate.bind(this)}>
          <Text style={styles.syncButton}>点击更新</Text>
        </TouchableOpacity>
        {progressView}
        <Image style={styles.image} resizeMode={"contain"} source={require("./images/laptop_phone_howitworks.png")}/>
        <TouchableOpacity onPress={this.toggleAllowRestart.bind(this)}>
          <Text style={styles.restartToggleButton}>Restart { this.state.restartAllowed ? "allowed" : "forbidden"}</Text>
        </TouchableOpacity>
        <TouchableOpacity onPress={this.getUpdateMetadata.bind(this)}>
          <Text style={styles.syncButton}>Press for Update Metadata</Text>
        </TouchableOpacity>
        <Text style={styles.messages}>{this.state.syncMessage || ""}</Text>
      </View>
    );
  }
}

const styles = StyleSheet.create({
  container: {
    flex: 1,
    alignItems: "center",
    backgroundColor: "#F5FCFF",
    paddingTop: 50
  },
  image: {
    margin: 30,
    width: Dimensions.get("window").width - 100,
    height: 365 * (Dimensions.get("window").width - 100) / 651,
  },
  messages: {
    marginTop: 30,
    textAlign: "center",
  },
  restartToggleButton: {
    color: "blue",
    fontSize: 17
  },
  syncButton: {
    color: "green",
    fontSize: 17
  },
  welcome: {
    fontSize: 20,
    textAlign: "center",
    margin: 20
  },
});

/**
 * Configured with a MANUAL check frequency for easy testing. For production apps, it is recommended to configure a
 * different check frequency, such as ON_APP_START, for a 'hands-off' approach where CodePush.sync() does not
 * need to be explicitly called. All options of CodePush.sync() are also available in this decorator.
 */
let codePushOptions = {
        //设置检查更新的频率
        //ON_APP_RESUME APP恢复到前台的时候
        //ON_APP_START APP开启的时候
        //MANUAL 手动检查
        checkFrequency: CodePush.CheckFrequency.MANUAL
    };

App = CodePush(codePushOptions)(App);

export default App;
5.发布更新的版本
更新时机
一般常见的应用内更新时机分为两种,一种是打开App就检查更新,一种是放在设置界面让用户主动检查更新并安装
上文app.js中的Demo代码,是让用户自己点击选择更新。
发布CodePush更新包
在将RN的bundle放到CodePush服务器之前,我们需要先生成bundle,在将bundle上传到CodePush。
1.生成bundle
react-native bundle --platform 平台 --entry-file 启动文件 --bundle-output 打包js输出文件 --assets-dest 资源输出目录 --dev 是否调试
生成android 包案例如下,需要先在项目根目录下创建bundle/android 两个文件夹。
react-native bundle --entry-file index.js --bundle-output ./bundle/android/index.android.bundle --platform android --assets-dest ./bundle/android --dev false
将bundle文件夹下的打包内容,拖拽至项目根目录下,开始下一步的发布到服务器步骤。
2.上传bundle
将生成的bundle文件上传到CodePush,我们直接执行下面的命令即可。
code-push release-react <Appname> <Platform> --t <本更新包面向的旧版本号> --des <本次更新说明>
注意: CodePush默认是更新Staging 环境的,如果发布生产环境的更新包,需要指定–d参数:–d Production,如果发布的是强制更新包,需要加上 –m true强制更新
code-push release-react <appName> android --t 1.0.0 --dev false --d Production --des "这是第一个更新包" --m true
这里需要强调 - -t 1.0.0的含义,这个1.0.0含义是app的版本号,对应android/app/build.gradle中defaultConfig versionName版本号,对应的应用版本(targetBinaryVersion)是指当前app的版本,而不是你填写的更新版本。譬如客户端安装的版本是 1.0.0,如果我们需要更新客户端,那么targetBinaryVersion(- -t)填的就是 1.0.0。此外,项目中defaultConfig versionName版本号需要改为三位的,默认是两位的,因为CodePush需要三位数的版本号。
code-push deployment ls <appName> -k
查看应用包的状态信息
也可以到微软的App Center官网,登录后查看你的发布包情况并管理。
发布第n个更新 继续执行第五步骤,注意- -t 填写的版本号和你客户版端版本号要相同。
6.app收到升级后更新
最后发布更新包后,客户端点击“点击更新”按钮,检测有更新,提示更新后更新应用即可。
问题总结
缺点
CodePush 是国外的服务器,可能会出现下载慢,更新失败(An unknown error occurred.)等问题,并且CodePush 主要更新JS/HTML/Image等,不会更新JAVA内容。因此本人推荐自己搭建code-push-server服务器来发布更新。
If a thing is worth doing it is worth worth doing well.